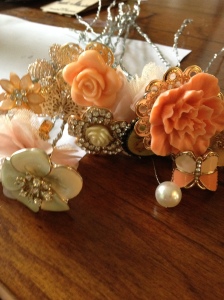
I had wanted to make a brooch bouquet for our wedding for a long time. But my mum pooh-poohed the idea, and so we had several meetings with a florist, many of which were spent with me going on and on about how flowers die, so technically it was a massive waste of money and so I didn’t want to have too many flowers. To a florist. I know.
Two or three weeks before the wedding, we started working on an extra wedding magazine at work to run alongside that issue. It’s probably the worst thing to be doing a few weeks before your bash – immersed in other people’s stunning, personal, highly individualised weddings. I started to get panicky that ours would be… not right. Not “us” anyway. And so “Fuck it, I’m having a bloody brooch bouquet!” It was very important for me to have a photo of my dad, so he could come down the aisle with me. Searching for a small frame that could dangle off the stems was tricky as they seemed to be sold only in bulk. Weirdly, a week before the wedding, I was going thru some of Dad’s things, and found a small frame in which he used to keep a photo of me. Perfect.
Obviously I didn’t have time to scour and collect meaningful bits and bobs slowly, like you’re ‘meant’ to, but it actually helped with costs to run into the high street shops for gems – and meant I didn’t feel too bad about tearing them apart. I did take two special bits for the bouquet. My dad gave me a gold-coloured rose brooch that belonged to me grandma (I collect Roses), and then I also used a butterfly brooch from Topshop that I’ve had pinned to my pin-board at work since I started and has followed me around all the magazines on which I’ve worked. It’s kept me company so far, so I thought it would be nice to take it with me down the aisle.
I love crafts that are a bit slapdash and don’t require specific, careful detail(which is why me a papercrafting will never be friends), so this was right up my street. I made enough flowers over the evenings on the run up to the wedding to use among real flowers in mine and my bridesmaids bouquets. Surprisingly fast (and addictive) to do. Every trinket is different, so it’s all about working out how you’re going to attach your wire. Then wrap green garden tape around each stem. Luckily, my florist took the flowers from me and incorporated them into my bouquet – so I didn’t have to worry about that side of things. But it seems pretty simple, and now it’s all dried, I might just take the trinket flowers and make them into a permanent posey.


